Scratch vs Python

scratch-python-fightWhich is better for teaching coding in KS3: Scratch or Python? There’s only one way to find out!

But seriously… I love Scratch. I think it’s a great tool for getting children interested in computing, and I do think there’s a role for it in secondary schools too. “It’s a bad workman who blames his tools,” I say to myself. You can do some quite sophisticated things with Scratch, like bubble sorts and Caesar cyphers. Ah, Caesar cyphers.

I was all set to use Scratch and cyphers as an entry to programming with my Year 7 students, and I made a working Scratch project that looked a bit like this:

Caesar cypher in Scratch

There may be a much easier way of doing this, but at least I understood how it worked, and it worked.

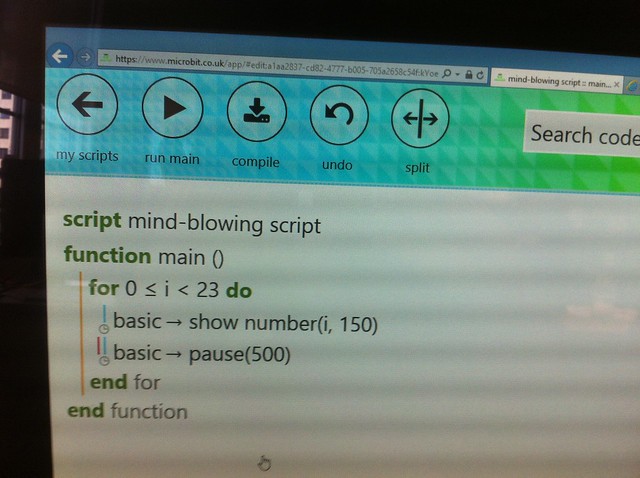
Then I set about planning a lesson to teach this. Some of my pupils have never used Scratch before; some have, but I need to keep everyone more or less on the same page. Two hours into typing up a work sheet for building a highly simplified version of the code above, I started to have serious misgivings about using Scratch for this. Try explaining – to someone unfamiliar with Scratch – precisely how to build this block:

mod block

There are a lot of blocks-within-blocks there, including two that are the same colour, and hence very difficult to see. It should be do-able for children familiar with Scratch, but even then it’s very fiddly, and I don’t know how to explain it simply to a novice.

Compare this with the same sort of code in Python:

Caesar cypher in Python

Now, this may be an unfair comparison, some programming languages are better suited to certain tasks; for example, today I was on a Python course run by an exam board and learned that Python isn’t really suitable for certain controlled assessment tasks that require storing and sorting data (such as exam results). There was also a useful nugget about discouraging students from searching for solutions on StackOverflow (or similar); solutions can be confusing, over-elaborate, over-esoteric or just plain wrong. Plus such forums tends to involve a certain amount of men trying to show they can pee higher, or in a more elaborate way than anyone else.

But I’m impressed with the brevity and elegance of the Python code – and my hunch is that it would be easier to teach. I could, in extremis, dictate or get my pupils to copy the code out and run it, mistype it, break it, fix it. Even if they don’t know what it all does, they could get something working quite quickly and, possibly, learn a bit of Python by jumping in at the deep end (much as people of my generation did with BASIC on early home computers, typing programs out of magazines).

The other thing drawing me to Python is that it could level the playing field with my Year 7s; some have done loads of Scratch and Kodu, some have done none (and some have never even done any ICT!). But I suspect none of them has done any Python, making it easier for me to teach and less bewildering for those who feel they are behind.

I also learned today that some exam boards are outlawing Scratch from GCSE course work – another nudge for me down the Python route.

So after half term, I shall be throwing my Year 7s in at the deep end with Python – after a brief ‘hello world I am the greatest’ intro to IDLE. I’ll let you know if we sink or swim…

Posted in computers, education, ICT | Tagged , , , | 4 Comments

Raspberry Pi traffic light project, part 2

Playing with GPIO Zero

In the first part of this project, we made some traffic lights out of LEDs attached to a Raspberry Pi computer, and we wrote code to make them light in sequence using the Python programming language.

This was made really easy because we used a Python library called GPIO Zero. Now we’re going to add a button to simulate a pedestrian crossing, and we’ll see just how incredibly easy that is, thanks again to GPIO Zero.

First, we need to find a switch and connect it to the Raspberry Pi. I used a tiny button that fits on my breadboard, but you can use any button as long as it’s ‘fleeting’ – that means it should pop back out when you let your finger off it.

I wired up one side of my button to GPIO 3 (that’s the blue wire in the diagram below), and the other side back to our common earth / GND (that’s column 7 A-E on my little breadboard). The wiring diagram now looks something like this:

Adding a button

In real life, it looks something like this:

Raspberry Pi adevntures in physical computing

Open Python 3 / IDLE, and edit the traffic-lights.py code from last time, to look like this:

button code

You can copy and paste the code from here:

from gpiozero import LED, Button
from time import sleep

red = LED(18)
amber = LED(2)
green = LED(17)
button = Button(3)

print("Press the button when you want to cross.")

green.on()
amber.off()
red.off()

while True:
    print("Wait")
    button.wait_for_press()
    green.off()
    amber.on()
    sleep(5)
    amber.off()
    red.on()
    print("Cross now.")
    sleep(10)
    amber.on()
    sleep(5)
    green.on()
    amber.off()
    red.off()

Now when you run the code (press F5), the traffic lights should stay green, until you press the button. This is like the button on a pedestrian crossing. Then the lights should change and you get a message in the console window telling you to cross – when the traffic light is red.

Let’s look at some new instructions we’ve used here.

from gpiozero import LED, Button

Here we’ve imported the ‘Button’ function (as well as the ‘LED’ one we used before) from the GPIO Zero library.

button = Button(3)

This tells the Raspberry Pi that we’ve connected a button to GPIO pin 3.

print("Press the button when you want to cross.")

This prints a message in the console window. That’s how we know when to cross.

button.wait_for_press()

This is a really, really clever instruction. It pauses our code until you press the button – useful because we want the traffic lights to stay green, until we want to cross the road.

So that’s it – you’ve made a working pedestrian crossing – sort of!

If you want to take this project further, here are a few ideas:

  • Instead of printing ‘wait’ and ‘cross now’ in the console, add red and green LEDs for a separate set of lights for the pedestrian. Build them into a box with the button, perhaps using an old soap box.
  • Add a buzzer to go BEEP BEEP BEEP when you can cross.
  • Add another button for the other side of the road. Can you make the WAIT lamp light on the other side when a pedestrian presses the button to cross?
  • Add another set of traffic lights for cars, and build them into cardboard tubes like toilet roll holders.
Posted in computers, Raspberry Pi | Tagged , | 3 Comments

First physical computing project with Python on Raspberry Pi

I’m really excited about a Python library called GPIO Zero. This makes it very easy to use the Raspberry Pi’s GPIO pins to do some physical computing in the Python programming language. The GPIO pins are how you connect your Pi to the real world, and their accessibility is what makes the Rapsberry Pi such an exciting device for so many people.

Here’s a simple traffic light project you could use to introduce Python and physical computing at the same time. You can get ready-made traffic light kits, but you make this one yourself.

Aim
In this project you will make a pedestrian crossing with 1 set of traffic lights and a push button, and learn how to connect your Raspberry Pi to lights and switches, and also learn some simple concepts of the Python programming language.

You will need:

  • A Raspberry Pi (any model should do) with a recent version of Raspbian OS and the GPIO pins physically accessible – the Pibow Coupé case is good for this.
  • An internet connection to install the GPIO Zero Python library (not needed thereafter).
  • 3 LED lights, preferably red, yellow and green.
  • A small breadboard (I used a tiny one I got with an Arduino kit).
  • Some female – male jumper wires to connect to your Pi.
  • Some male-male jumper wires to connect things on your breadboard to each other.
  • 3 x 270Ω (or similar) resistors.
  • A push button switch – any kind will do, as long as it’s a fleeting switch that pops back up after you press it, and you can connect it to your breadboard.

Getting ready
First, install GPIO Zero. You can find instructions here. I got some error messages when I did this, but it still seems to work ok.

Next, choose some GPIO pins on your Pi to use. You can use others, but I used pins 17, 18 and 2 using the BCM numbering system. (There are two different ways of numbering the Raspberry Pi pins; GPIO Zero uses the BCM / Broadcom system, which is how the pins are labeled on the Pibow Coupé case). If you’re not sure which pin is which, look at this incredibly clever & comprehensive interactive guide by Gadgetoid.

With your Pi turned off, wire up some light bulbs before we get programming. Use 4 female-male jumper wires to connect BCM pins 17, 18, 2 and a GND (ground/earth) pin – I used physical pin 6 as my GND, though there are others – to separate rows on your breadboard. It could look something like this:

Playing with GPIO Zero

I used the GND pin as a common earth for all the LEDs. When you wire up a light bulb in school, you need to complete a circuit by connecting it back to the negative terminal on a battery, and this is the same – completing the circuit by connecting it back to GND. We can use the same GND for all our LEDs to make our wiring simpler.

The basic idea is that you connect GPIO Pin 17 on the Raspberry Pi to a 270Ω or 330Ω resistor – this is to stop the LED taking too much current from the Pi. You then connect the other side of the resistor to the long leg of the LED, and the short leg of the LED back to the GND pin on the Pi. You do the same for the other LEDs, all using the same GND pin.

The wiring looks a bit like this:

Now turn the Raspberry Pi on and test the LEDs and wiring. Open the Python IDLE editor (Menu > Programming > Python 3):

opening Python

and enter the following Python code in the shell:

from gpiozero import LED
green = LED(17)
red = LED(18)
amber = LED(2)
green.on()
amber.on()
red.on()

That’s all the code you need to start lighting the LEDs. It should light each LED in turn. If they don’t all light, check your wiring and check the LEDs are the right way round – they only work one way.

Have a play around, turning the LEDs off and on, and see if you can make them blink:

typing in the python shell

Let’s look at these instructions line-by-line to understand what they do:

from gpiozero import LED

Python uses libraries of useful code that lots of people want to use. Here we are importing the ‘LED’ statement from the ‘GPIO Zero’ library, which makes physical computing in Python really easy to code.

green = LED(17)
red = LED(18)
amber = LED(2)

The next 3 lines then tell the RaspberryPi that we have connected some LEDs to pins 17, 18 and 2 and that we’re going to call them red, amber and green – you could pick any names you want.

The last 3 lines turn the lights on:

green.on()
amber.on()
red.on()

So far we’ve been typing commands straight into the Python ‘shell’, or command line. It’s useful to be able to save sets of instructions in a text file so they can be run over and over again, without having to retype the code each time. So, next open a new file and save it as traffic-lights.py:

Then type in the following, save it again, and run it by pressing F5. Your LEDs should now light in a sequence like a set of real traffic lights: green, amber, red, red & amber together, and then green again.

from gpiozero import LED
from time import sleep

red = LED(18)
amber = LED(2)
green = LED(17)

green.on()
amber.off()
red.off()

while True:
    sleep(10)
    green.off()
    amber.on()
    sleep(5)
    amber.off()
    red.on()
    sleep(5)
    amber.on()
    sleep(5)
    green.on()
    amber.off()
    red.off()

Notice we’ve got some new Python commands here. We have imported ‘sleep’ from the time module – sleep(10) pauses for 10 seconds, sleep(5) for 5 seconds.

We’ve also used ‘while True:’ – this is like the ‘forever’ block in Scratch. The code that follows while True: will keep on running until you close Python.

Notice as well that the code that follows is all indented by 4 spaces at the start of each line. These spaces at the starts of lines are important in Python, as we will see in the next part when we will add a push-button to make a pedestrian crossing…

Massive thanks to Ben Nuttall and the rest of the folk at the GPIO Zero project for building such a great Python library that, I think, makes physical computing with Python actually easier to learn that Scratch! My code is rather similar to theirs, but I wrote it even before I realised they had a traffic light project too – check it out!

Posted in computers, Raspberry Pi | Tagged , | Leave a comment

Keeping physical computing simple

I love Scratch. I think it’s actually under-rated as a way of teaching computing, even in secondary schools (KS3). I remember a long time ago someone on the BBC ‘Computer Programme’ defending BASIC with the words ‘it’s a bad workman who blames his tools’, and I think the same applies to Scratch. You can do a lot with Scratch, more than I think some people give it credit for. If you can do a bubble sort or build a simple or complex working Enigma machine, it’s quite a flexible programming language.

But I want to do some physical computing with my KS3 students. I excitedly read news about the new version of Scratch bundled with Raspbian Jesse with GPIO hooks built-in – but then I looked at the sample code and blocks…

Scratch GPIO on Raspberry Pi

Ouch. The broadcast messages to make the GPIO pins work – to light LEDs, poll switches etc – look really complex. So complex, in fact, I think they totally defeat the point of using Scratch in the first place.

I’ve already decided Python will be our text-based language of choice as we introduce computing to the curriculum, so I’m incredibly excited by a project called GPIO Zero created by Ben Nuttall of the Raspberry Pi foundation and others. This is a Python library designed to make physical computing on the Raspberry Pi under Python as simple as, well, it should be. Look at this code:

Using GPIO Zero Python library

That is the entire code needed to turn an LED on and off in a loop. Pretty impressive.

Playing with GPIO Zero

I had a play and hooked 3 different LEDs up to a Raspberry Pi and got them all blinking in turn and then lighting up together in a matter of seconds. Very promising, and I am increasingly convinced that Python is the way to go for teaching computing in KS3.

gpiozero python code

Posted in computers, Raspberry Pi | Tagged , | Leave a comment

BBC Microbit: first impressions

I was lucky to find out about & get a ticket to the CAS London event at King’s College today, where a group of teachers got hands-on with the BBC Microbit, the micro-controller that – we are told – will be given free by the BBC to every Year 7 pupil in the country.

BBC Microbit training

It was a very practical, hands-on event. We all got to play with the Microbit, write code, upload it, shake it, prod it. This was a mixed-blessing in some ways, as I think we all wanted to take one home. We couldn’t – we had to hand them all back at the end of the session. I know there are production problems, but if every teacher there had been given one to take home, they would have had 100 unpaid evangelists raving from the rooftops about this device.

BBC Microbit training

So, a few observations…

As things stand, the official web site and lessons are very tied into Microsoft’s Touch Develop language. Code Kingdoms Javascript and Python are coming, which is pretty much essential to me, as I have already committed to Python being our text-based language in my school. I’m very reluctant to teach a different language, although the Microsoft block-based language might be a good starter. There’s no Scratch-based editor, though there was mention of a possible hack using the Python API – I’d be very interested in that!

BBC Microbit training

The Microsoft Touch Develop language is designed to be used on tablets and touch-screens, and the lessons are full of prompts telling you what code to put in next; this holds your hand, but possibly too much. One teacher raised a very good point that she had completed all the lessons, but was really just following instructions – you don’t even need to type the code in the text-based environment, you can just click on buttons. So you can do all the activities without necessarily understanding what the code is doing or what individual instructions do.

Microsoft Touch Develop language

I found the workflow from lessons, to code to compiling a bit confusing. Your code has to go via a remote server to be compiled; this then allows you to download a .HEX file that you drag and drop onto the Microbit (connected to the computer by USB) in a desktop Finder window. Simple enough, but…

transferring compiled code to the Microbit

Two snags: one, I got lost towards the end of lessons several times and had to go back to the start, especially when I tried to do the extension tasks – something about the tutorial workflow isn’t quite as intuitive as it could be. A couple of times the prompts vanished as well, or seemed to tell me I needed instructions I just couldn’t find. I had to abandon the ‘Offset Image’ project because of this. Nice having a goal of getting ‘exprStmt’ in my code – but what is it? Where do I find it? I can’t type it in.

On-screen prompt for coding

So I click there and get…

But what IS code?

Secondly, you need an internet connection AND the remote server to be up. I think the Microbit badly needs a standalone compiler that means you can program the beastie when the wifi is flaky or the remote Microbit compiler is offline. I raised this question, and apparently Microsoft are considering this. I suspect others may independently make compilers once (if?) the project is open sourced.

There are also big questions about the delay and roll-out, raised by @digitalmaverick. Why do schools have to register to get Microbits? The information about addresses of all secondary schools must exist somewhere (hello DfE), maybe even Year 7 roll numbers, so why not just send them out addressed to ‘Headteacher’ or ‘Head of ICT’ regardless? We were told by the nice man from Microsoft in Seattle that they emailed all the heads and loads of emails bounced back – well I’m not sure that’s good enough.

There was also the alarming news that the BBC deadline for registering your school is only a few days away – the end of September! How many schools don’t even KNOW about the Microbit, let alone have registered? I registered my school, but haven’t received a confirmation email, so will we actually get any Microbits at all this year? Who knows.

I’m very surprised and disappointed no-one from the BBC was there today (as far as I can tell). If Microsoft can fly someone from Seattle, I think the BBC can send someone on a bus or tube from W1A. Were they dodging awkward questions? Very poor show, BBC.

We were told the Microbits won’t ship until January at the earliest, which does really cut into the teaching year if you’re planning (or have planned) to use the Microbit in Year 7. I think given the delay, they should have decided to send them out to teachers in January 2016 and roll it out to Year 7s in the 2016-17 academic year, so we could have planned a scheme of work around it. I think it’s too late now for serious academic use in 2015-16.

Ownership is a tricky issue too. We were reminded that these Microbits belong to the children, not the schools. So we hand them out to the Year 7s. Then we ask them to bring them in for the next lesson. How many children will remember / find / lose them? It’s a nonsense. If you’re going to teach with them, they must remain in school. I’d want to hang on to them and hand them out at the end of term, or at the end of the unit, for them to take home.

Apparently the Bluetooth module isn’t working yet – this is quite important as it will allow the Microbit to be programmed from a phone or tablet (though my students aren’t allowed phones in class), but the real killer application for this is one that was tantalisingly touched on: the possibility that individual Microbits could communicate with each other wirelessly. This could be just amazing. Imagine a whole class passing a ball graphic or message to each other round a room. Or something actually interesting that only a child could invent. I do hope that something comes of this.

Anyway I had fun this morning. My favourite project was the dice using the accelerometer. Shake the Microbit, roll the dice:

Shake the Microbit, roll the dice

Big thanks to CAS London for organising this event. Good to get my hands on the device and meet some fellow teachers, especially some who teach in schools like mine who I wouldn’t have met otherwise. A great morning tinkering & chatting.

And then I had to hand it back. Sadface.

BBC Microbit training

Posted in computers, education, ICT | Tagged , , | 1 Comment