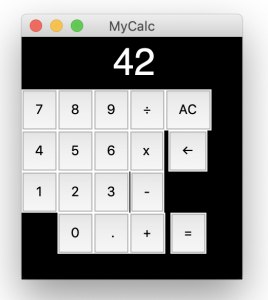
 Making your own apps, even simple ones, with a GUI still seems to be surprisingly tricky, and this makes it hard to teach, especially if you want to build an app that will run standalone, or near-standalone, on a real computer.
Python is a very popular language for teaching and developing, but its default library for making GUIs, tkinter, is pretty scary and horrible. I have built a few apps for touch screens using it: a radio, an audio play-out system for radio or theatre and a similar cartwall.
Tkinter does give you a lot of control over layout, but I do think it’s way too hard for a beginner, especially a student who’s just getting some confidence with Python and wants to make a ‘real’ app with buttons and widgets.
What is guizero?
This is where guizero comes in. Created by Laura Sach and Martin O’Hanlon at Raspberry Pi, it’s a wrapper round tkinter that makes creating GUIs much more accessible. I was lucky enough to be on a Picademy course where Laura was one of the tutors, and her enthusiasm and ability to make complex things accessible is inspiring and infectious.
If you want to get started with guizero, there’s a great primer on the Raspberry Pi site, and Laura & Martin have also written a book which you can download as a free PDF.
My only previous guizero project was a simple word processor, WoolfWrite. I got slightly obsessed about how word processors lacked an on-screen word counts, so important to anyone writing an essay, job application or being paid by the word! Also, different web forms and apps calculate word counts in different ways, so I decided to write my own to see if I could figure out why. I should probably do a blog post just on that one day, coding is great way to learn, like the time I had to code a solution to the Monty Hall maths problem before I could understand it.
Let’s make a calculator
 Laura and Martin’s book is full of fun games and even a meme generator, but I wanted to make something a bit more prosaic: a calculator app. I wasn’t kidding myself this would be easy: as I discovered when I turned 3 micro:bits into a calculator, calculator UX and UI is surprisingly hard.
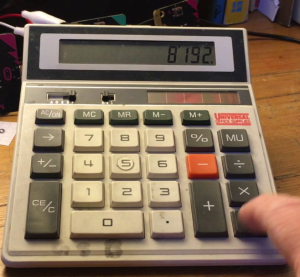
My aim was to use the simplest possible Python code, so anyone relatively new to the language could follow it. I also decided not to look at any other calculator and that it should behave pretty much like my ancient solar-powered desk calculator that I retrieved from a dustbin where one of my BBC bosses had thrown it because he disagreed with an answer it had given. To be fair, he had a degree in maths from Cambridge, so he was probably right.
Breaking down the code
I think real, practical projects are a great way to learn, so let’s break it down, chunk by chunk. There are probably more efficient ways of writing the code, this is just what I came up with today. Tomorrow I might write it very differently!
Here is every bit of code in order with some explanations. Note I always use single quotes at they are easier for children to type. You can find the full program here: https://github.com/blogmywiki/guizero-calc
Set-up
# imports -------------------------------
from guizero import App, Text, PushButton

# initialise variables ------------------
displayString = ''
a = False
b = False
result = 0
operator = ''
operatorFlag = False
Here I import the features of guizero that I’m using and initialise the variables. It stores the current displayed number in a string called displayString. a and b are the two numbers you’ll be adding, subtracting etc. result is the answer, operator is the operation you’ll be performing and operatorFlag is used to keep track of whether or not you’ve pressed an operator key.
# app -----------------------------------
app = App(title='MyCalc', layout='grid')
app.bg = '#000000'
This defines the title of the app that appears in the very top of the window. Guizero has a simple mode that just stacks elements on top of each other, but we need to select the grid layout for our calculator as we want buttons in a grid. I’ve also made the background of the app black (#000000) to look a bit like an Apple calculator app.
The functions
# functions -----------------------------
def inputNumber(key):
    global displayString, operatorFlag
    if operatorFlag:
        displayString=''
        operatorFlag = False
    displayString = displayString + key
    display.value = displayString
The first of several functions is inputNumber(). When you click on a number button, the button passes a string like ’7′ to this function which adds the number to the display string and shows it in the display element. If you’ve just pressed an operator key like ‘+’ or ‘x’ it clears the display string ready for the next number.
def operatorKey(key):
    global a, operator, operatorFlag, displayString
    operator = key
    operatorFlag = True
    if not a:
        a = float(displayString)
If you press an operator key, like ‘+’ or ‘-’, the button passes it to this function which assigns it to the operator variable. It sets the flag to say that it’s been pressed and if the first number, a, doesn’t exist because it hasn’t been set, it assigns the current contents of the display as a floating point number to a
def evaluate():
    global a, b, result, operator, displayString
    if not a and not b:
        return
    elif a and not b:
        b = float(displayString)
    if operator == '+':
        result = a + b
    elif operator == '-':
        result = a - b
    elif operator == '/':
        result = a / b
    elif operator == 'x':
        result = a * b
    # stop decimal places appearing for whole numbers
    if result - int(result) == 0:
        result = int(result)
    displayString = str(result)
    display.value = displayString
    a = result
This is the biggy! Evaluate does the calculation.
First, it checks that you have entered two numbers, a and and b.
If you’ve not set either number, it just bails out of the function with the ‘return’ instruction. This could be summarised as ‘come back when you’ve entered some numbers!’
If you’ve set a but not b, it then assigns the current display contents to b.
Then it gets on and performs the relevant calculation of your two numbers, checking that if the floating point result is actually a whole number. If it is, it turns it to an integer variable type to avoid trailing decimal points and zeros being displayed.
It then does one last thing: it assigns the result to the a variable, ready to be calculated on again. This means that, just like on a real calculator, if you press 7 + 2 = you’ll see 9, then if you keep pressing =, 11, 13, 15 etc.
def allClear():
    global a, b, operator, result, displayString
    a = 0
    b = 0
    operator = ''
    result = 0
    displayString = ''
    display.value = '0'
This function allClear() is called if you press the AC (all clear) button. It resets everything back to 0.
def backspace():
    global displayString
    if len(displayString) > 1:
        displayString = displayString[:-1]
        display.value = displayString
    else:
        displayString = ''
        display.value = '0'
Rather than having a CE (clear entry) button I decided to implement a backspace instead. It trims the last character of the display string, unless it’s shorter than 2 characters long, in which case it just clears it.
Layout and buttons
# layout & buttons ----------------------
display = Text(app, text='0', color='#FFFFFF', grid=[1,0,15,1])
display.text_size = 37
display is the area in which the numbers are displayed. I set the initial text to ’0′ and the text colour to white. You can specify fonts, but I decided to leave it to a default font and it looks ok on a Mac at least. The grid statement puts it in the second column with a stupidly large span of 15 columns and 1 row to prevent it moving the buttons too much when the numbers get long. This needs a bit of work as if you divide 22 by 7 the buttons do still spread out a bit.
btn7 = PushButton(app, command=inputNumber, args=['7'], text='7', grid=[0,1])
btn8 = PushButton(app, command=inputNumber, args=['8'], text='8', grid=[1,1])
btn9 = PushButton(app, command=inputNumber, args=['9'], text='9', grid=[2,1])
btn4 = PushButton(app, command=inputNumber, args=['4'], text='4', grid=[0,2])
btn5 = PushButton(app, command=inputNumber, args=['5'], text='5', grid=[1,2])
btn6 = PushButton(app, command=inputNumber, args=['6'], text='6', grid=[2,2])
btn1 = PushButton(app, command=inputNumber, args=['1'], text='1', grid=[0,3])
btn2 = PushButton(app, command=inputNumber, args=['2'], text='2', grid=[1,3])
btn3 = PushButton(app, command=inputNumber, args=['3'], text='3', grid=[2,3])
btn0 = PushButton(app, command=inputNumber, args=['0'], text='0', grid=[1,4])
btnDec = PushButton(app, command=inputNumber, args=['.'], text=' .', grid=[2,4])

btnDiv = PushButton(app, command=operatorKey, args=['/'], text='÷', grid=[3,1])
btnMult = PushButton(app, command=operatorKey, args=['x'], text='x', grid=[3,2])
btnSub = PushButton(app, command=operatorKey, args=['-'], text='-', grid=[3,3])
btnAdd = PushButton(app, command=operatorKey, args=['+'], text='+', grid=[3,4])

btnEquals = PushButton(app, command=evaluate, text='=', grid=[4,4])
btnAC = PushButton(app, command=allClear, text='AC', grid=[4,1])
btnCE = PushButton(app, command=backspace, text='←', grid=[4,2])
All the buttons in a grid! I didn’t try to change their colours because, well, on a Mac you can’t. Buttons should be grey anyway, right?
The grid numbers specify the column and row of each button, staring at 0 as the first column.
You can specify a function to call when you push a button using command=...
If the function takes parameters, like inputNumber or operatorKey, you have to use args=[] to pass it. If you used, say operatorKey(7) instead, the function would fire as soon as you open the app and put a number 7 on the display before you’d even clicked on anything. (Thanks to Matt, Carlos & Laura for helping me figure that out!)
The sneaky infinite loop
# display app loop ------------------------------
app.display()
Finally, this line creates the app loop. It’s important to think of this as an infinite loop that keeps polling the keys for events. As they say in the guizero docs:
You may be used to writing programs which contain loops or make use of the sleep() command, but find when you try to use these with guizero they cause your GUI to freeze. This is because guizero (in common with almost all GUIs) operates an event driven model of programming which may be different to the one you are familiar with.
What did I learn?
- How to create an app with a simple grid of working buttons
- How to pass parameters to functions from inside a button
- Why some of my previous attempts at Python GUIs failed: they run in their own infinite loop and some basic, familiar programming methods don’t work in this strange, parallel, event-driven universe.

I like this very much – most of the code even I can follow!
And happy to see you’ve got the right answer in your demo image :-)
I am only compitent in css can someone explain this to me?