Ceefax from an old Raspberry Pi

Got an old Raspberry Pi? Nostalgic for the golden age of teletext? Why not make your own in-house teletext server?

For those who may be unaware, teletext was a service common in European (PAL TV standard) countries that transmitted news and other information on analogue TV by sending digital signals in unused lines at the top of the TV screen that were normally unseen. The BBC’s teletext service was called Ceefax, the ITV had Oracle. Pre-smartphones and household broadband, both were hugely popular as a source of breaking news, sports results, booking holidays and watching programmes with subtitles (closed captions). Most teletext services are long-gone, but enthusiasts are doing digital archaeology to recover old pages from off-air S-VHS recordings, as well as creating new teletext services you access over the internet.

Here’s what you need:

  • Any old Pi, I used a model B, I’d recommend a ‘lite’ version of Raspberry Pi OS with no desktop and I added a USB wifi dongle – not needed on newer models
  • A phono/RCA lead for video out
  • Optional mini jack to phono lead for audio
  • A TV with a teletext decoder and a composite video AV input
  • Some internet

The TV I used is a cheap flat-screen one I bought in a supermarket just a few years ago, so I was surprised to discover it had a teletext decoder. The decoder has never been used, obviously, as analogue TV transmissions ended in the UK before I bought it and no Freeview DTV services broadcast old-fashioned steam teletext.

Ceefax page 100

The software you need to install is called vbit2 – head on over to https://github.com/peterkvt80/vbit2/wiki where you’ll find some instructions. I followed the first video guide linked from there.

I had problems getting analogue composite PAL video out because I forgot to unplug the HDMI cable to force it. Note that some models of Pi have the composite video on the same jack as the analogue audio out, so if your Pi doesn’t have that phono/RCA socket for video, you’ll need a lead that breaks out one of those extra long 2.5mm 4 pole jack plugs into something you can plug into your TV.

I installed Ceefax in the configuration settings in vbit2. It’s a good idea to set it to run at boot and update – note that to tick the relevant boxes you have to press the space bar. Took me ages to figure that out!

The TV I used has a USB socket for a basic media player mode and I found that gave enough juice to power my Pi, which saves another mains socket and takes the Raspberry Pi power supply out of the equation.

When the teletext service starts you should see the text on the screen jump up a bit. I think this is because it’s using the top line of the video to output the teletext lines and it needs to move it to the top lines that are normally unseen on a composite video out.

I fancied some music while browsing teletext, so I also installed mpc / mpd
sudo apt-get install mpc mpd

and added a radio station
mpc add http://icecast.radiofrance.fr/fip-midfi.mp3

and made it play – this seems to stick and play when rebooted which is nice.
mpc play 1

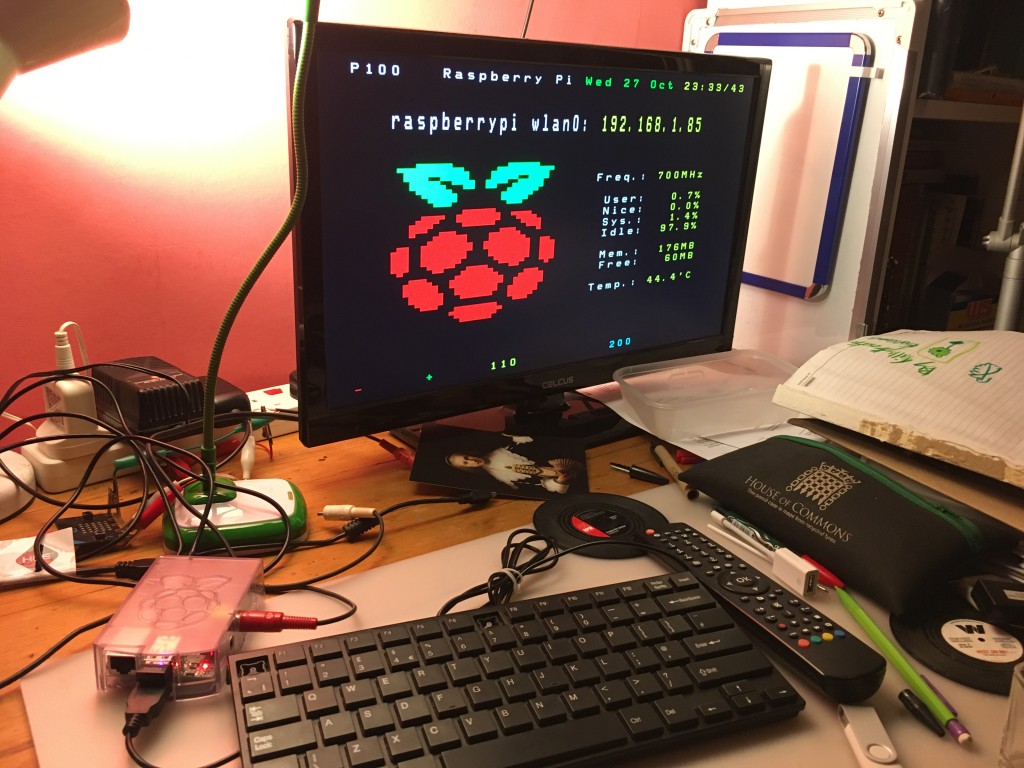
Connect the audio and composite video to your TV, select the appropriate AV input – and press the teletext button!

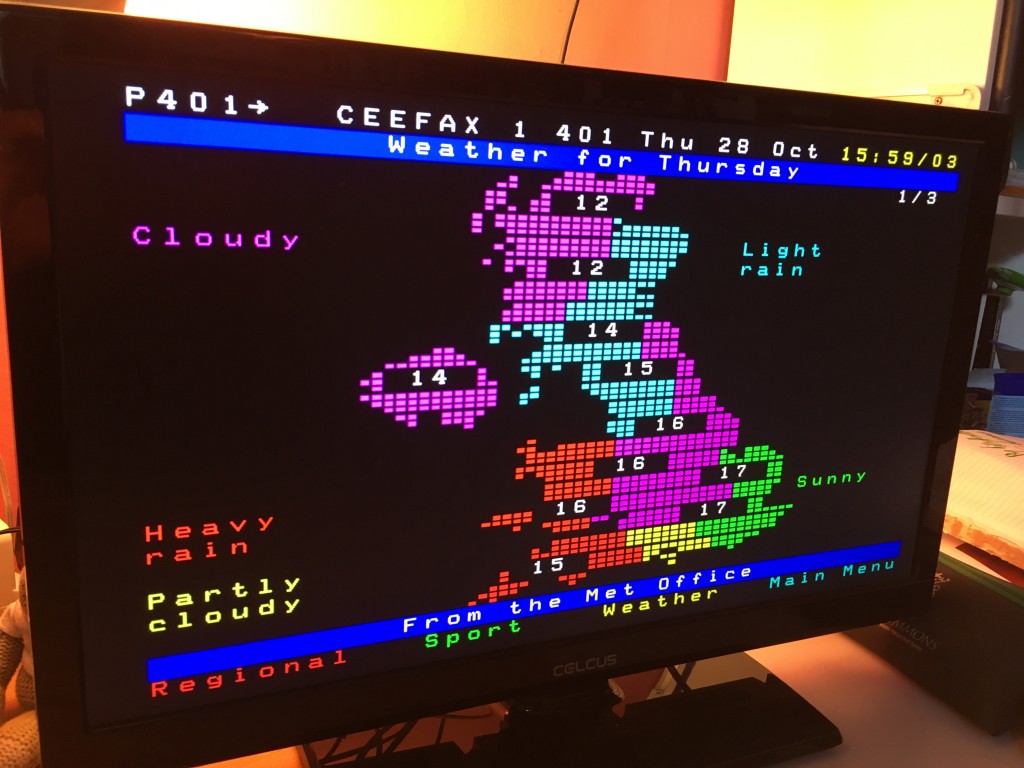
Ceefax weather map

The Ceefax pages are created by volunteer-coded software from a mixture of sources, including BBC News web pages and the Met Office for the weather. It’s great fun being able to browse up-to-date news stories by pressing numbers on a remote control like in the old days, and makes a welcome change from Twitter doomscrolling. If anything it’s slightly too fast, but even so it could make a useful history project showing students how we used to get up-to-date news and sports results before smartphones and widespread broadband internet.

Raspberry Pi generating teletext

You can view the new Ceefax pages in your browser on Nathan Dane’s pages here https://www.nathanmediaservices.co.uk/teletext-viewer/ and find out a bit more about how they work. Kudos also to Peter Kwan, designer of the first vbit hardware and software.

Posted in computers, nostalgia, Raspberry Pi | Tagged , , | 2 Comments

micro:bit pulse oximeter

Around the same time I bought a cheap eCO2 sensor, I bought a MAX30100 pulse oximeter board for a few quid. I never got it working, partly because the protocol for making it work is very complex (way more complex than an air quality sensor), partly because I didn’t know what I was doing, but also (I now discover) because I was using a faulty breakout board.

Flushed with the success of getting the eCO2 sensor working, I decided I’d have a crack at getting the pulse oximeter working in Python on a BBC micro:bit. And I failed. For now, at least. I even found a MicroPython library for the MAX30100 but it doesn’t work on a micro:bit, and the protocol is too complex for me to figure out just now. I may return to it one day.

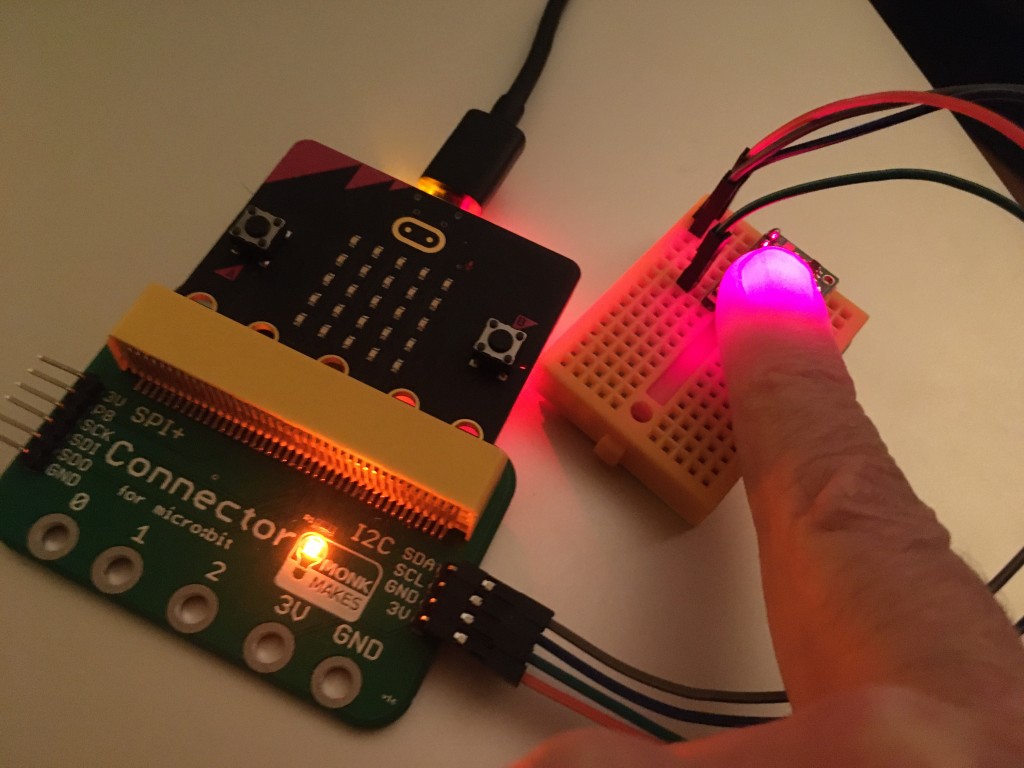
first version of the pulse oximeter

first version of my micro:bit pulse oximeter without an OLED display

There are, of course, Arduino drivers for the MAX30100, and perhaps a little known fact is that you can program the micro:bit using the Arduino IDE. It’s not, I warn you, very easy, and I’m not offering a step-by-step guide, but I’ll explain how you can build your own and offer a HEX file you should be able to flash direct on to a micro:bit (V2 only at the moment, though I think you could compile your own for a V1). You’ll need a micro:bit breakout board that exposes the i2c pins 19 and 20, some jumper wires, a breadboard, a MAX30100 pulse oximeter, and an optional 128×64 OLED display with an i2c interface.

Wiring could not be simpler as you connect the display and sensor the same way: GND pins to micro:bit GND, VCC to micro:bit 3v, SCLs to micro:bit SCL pin 19 and SDAs to micro:bit SDA pin 20. Flash this hex file (right-click and save link or target) to the micro:bit, you may need to press reset on the back of the micro:bit and the LED on the oximeter should light up. Put your thumb on it, and off you go. It also prints readings to the serial port, so you can do some data logging over USB on a computer as well, just open up a terminal app or web browser like the Google Chromelabs one or the micro:bit Python editor.

One note of caution: if you use my HEX file, the i2c addresses of the display and sensor are hard-coded, assuming the OLED display is 0x3C (decimal 60) and the sensor is 0×57 (decimal 87). If yours have different addresses, you’ll need to modify the source code and recompile it.

How did I make it?

Why am I asking myself questions? Because it’s a useful, if jaded, rhetorical device.

Urghh. I can’t quite face doing a tutorial on using the Arduino IDE to program a micro:bit just at the moment, maybe one day. Partly because I have it all set up and it works and I’m not entirely sure how I did it. I find that with the Arduino IDE. If it works, you don’t mess with it. I mean I still have a netbook with WindowsXP on it partly because for a long time it was the only machine I could reliably program Arduinos on.

So, in short… I added the Oxullo library for the MAX30100 sensor, and the Adafruit OLED libraries. I set the target machine to the V2 BBC micro:bit which may have involved installing something… urghh… can’t quite remember, I did it ages ago when I was building my micro:bit Arduboy clone.

I added some bits to the sample MAX30100 code to make the OLED display work, and amazingly, it all seems to work. You can read the source code here.

For amusement only

I wouldn’t use this for medical purposes, but it would be interesting to compare it with an inexpensive commercial pulse oximeter to see how it compares.

Posted in computers, microbit | Tagged , , , , , | 2 Comments

CCS811 indoor air quality sensor on a micro:bit

I was clearing out my toolbox of gubbins the other day and discovered an inexpensive CCS811 air quality sensor I’d bought ages ago and never done anything with. These are small sensors that measure Volatile Organic Compounds (VOCs) and can be used to give an approximation of CO2 levels in the air. They connect to microcontrollers using an I2C interface. You can read the data sheet here.

air quality sensor and BBC micro:bit

There are libraries to run them with Arduinos, of course, and here’s a port to MicroPython: https://github.com/Notthemarsian/CCS811. So should be easy to get it working with a BBC micro:bit, no? Well I had to do a bit of tweaking, but I think I have it working.

The micro:bit’s version of MicroPython lacks the readfrom_mem and writeto_mem instructions that this code relies on. Luckily I found this excellent blog post which explains some ways round this.

The other difference is that on the micro:bit, the I2C clock and data pins are fixed on pins 19 and 20, so there’s no need to pass the pins to the supporting module.

I’ve also assumed that the I2C address of the sensor is 90. I discovered this address by just running a program like this on the micro:bit with the sensor connected.

i2c.init()
print(i2c.scan())

I’ve probably committed some hideous crimes against Python, but by modifying the Notthemarsian code, I seem to have it working.

Here’s what I used:

  • a CCS811 sensor with some pins soldered on
  • a BBC micro:bit (V1 or V2) and a micro USB lead to connect to a computer
  • a breakout board that exposes the I2C pins – I used a Monk Makes one, but you could also use ones by Adafruit, Kitronik or Pimoroni, just make sure they have the I2C pins broken out as not all do.
  • jumper leads to attach the sensor to the breakout board – I used 4 female to female jumpers
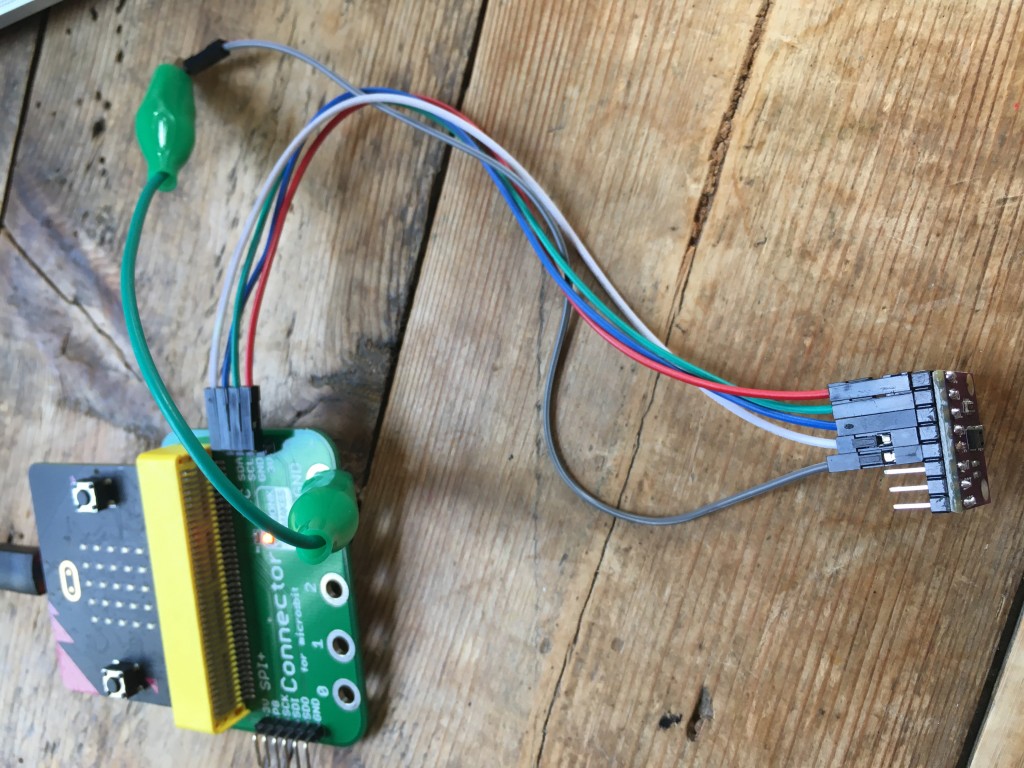
  • a way of attaching the sensor’s WAK (wake) pin the GND on the micro:bit – I used a female to male jumper wire and a crocodile clip lead, but there will be far more elegant ways than this
  • A computer with the micro:bit Python editor in a Chrome or Edge browser window, like https://python.microbit.org/ or https://python.microbit.org/v/alpha

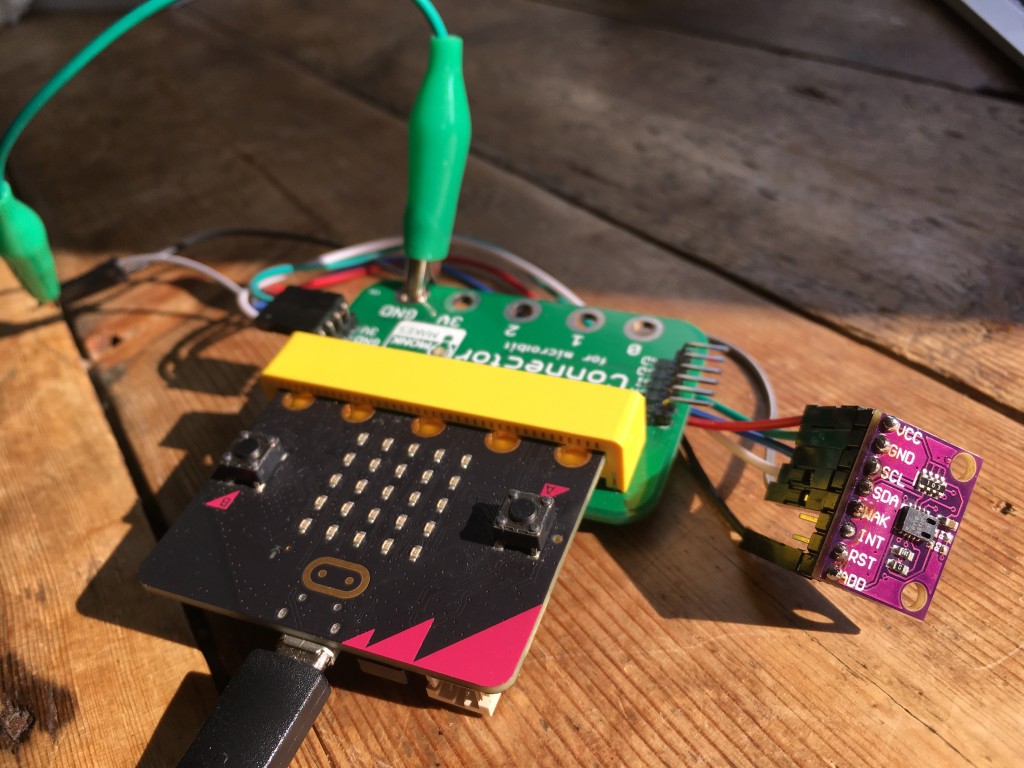
Air quality sensor connected to a BBC micro:bit

Connect the pins like this:

sensor  micro:bit
-----------------
VCC     3v
GND     GND
SCL     SCL (pin 19)
SDA     SDA (pin 20)
WAK     GND
INT     not connected
RST     not connected
ADD     not connected

Then flash this hex file on to your micro:bit (right-click and save link or save target). If you want to examine the contents, you can just drag the HEX file into an online micro:bit Python editor. You’ll see two files, main.py and the module CCS811.py. You can also add those files separately, but it’s easier just to use the HEX which you can flash straight onto a micro:bit, or drop onto the online Python editors.

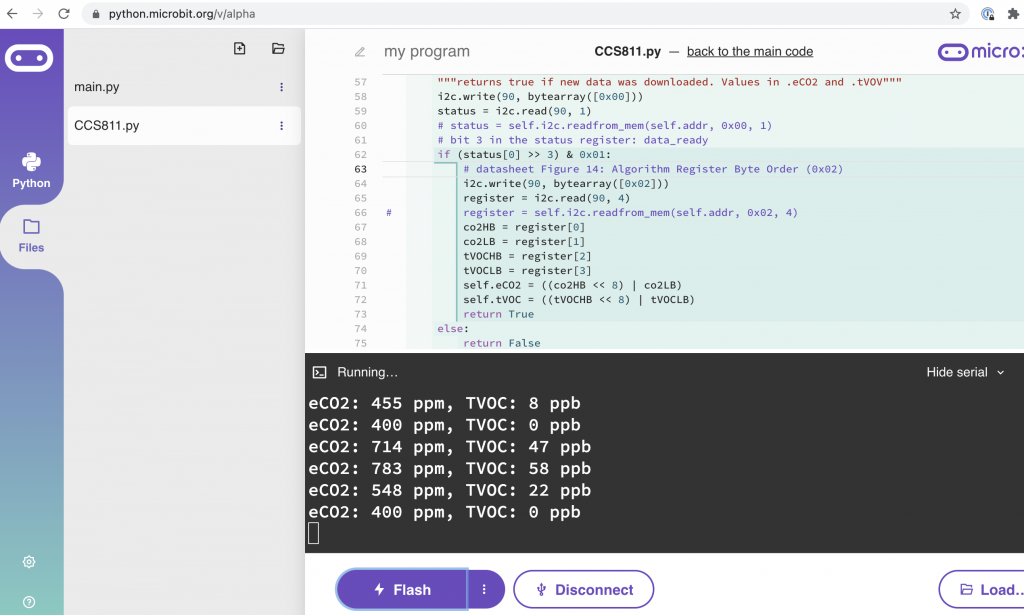
Live air quality data scrolling in the serial console in the alpha micro:bit Python editor

Then you need to open a serial console. Make sure you’re using Chrome or Edge. In the current regular Python editor, click on Connect and then Open Serial. In the Alpha editor, which has a serial console in the same screen as the code editor, click Connect and Show serial. You could actually use any serial console to read the data, such at the Chromelabs online one.

You should see data from the sensor scrolling in the screen, once per second. Huff and puff on it, and you’ll see the CO2 number rise. I waved a bottle of hand sanitiser at it, and it went crazy!

Let me know if you find this useful and get it to work. What would you use it for? How could you make use of the data?

Add an OLED display

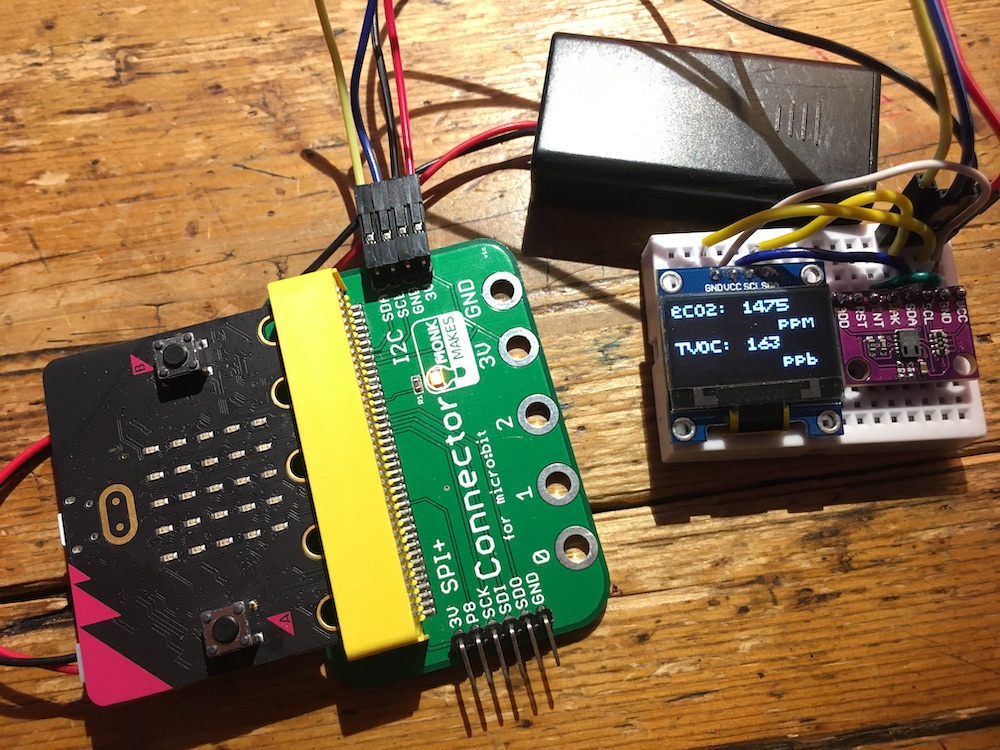
microbit air quality monitor with OLED display

This version of the project adds an OLED display, which makes the micro:bit air quality sensor self-contained. I left it running all day and found the eCO2 levels rose from around 1400ppm at lunchtime to over 5000 by 6pm. Opening a door to the outside had an immediate effect, the levels dropping very rapidly back to around 1500ppm, which does suggest simple ventilation like opening a door or window to the outside has a dramatic effect on air quality.

In addition to the micro:bit, breakout board and CCS811 sensor, I used a standard cheap 128×64 I2C OLED display, a tiny breadboard and a few jumper wires. The display and sensor should be available for just a few pounds or dollars from the usual suppliers. I just daisy-chained the OLED onto the same I2C pins as the air quality sensor.

This version of the project also shows how it’s possible to attach more than one I2C peripheral to a micro:bit. The code assumes the OLED display has an I2C address of 60 (0x3C) which luckily doesn’t clash with my air quality sensor’s address of 90 (0x5A). If you make this and have problems, do check the I2C addresses of your devices and tweak the Python code accordingly.

You can download the HEX file from here (right click and save link or target). The HEX contains all the Python modules needed to make the OLED display and air quality sensor work. Plug your micro:bit into your computer and drag and drop the HEX direct on to the MICROBIT drive. You can also drag and drop the HEX file on to the regular or alpha Python editors so you can examine and edit the Python code.

Like the previous project, this one also prints data to a serial console over USB, so you can monitor it on a computer as well. It might be neat to make this also send data by radio to another micro:bit which can log data, work out averages over longer time periods, maximums and minimums etc.

Simple air quality data logging

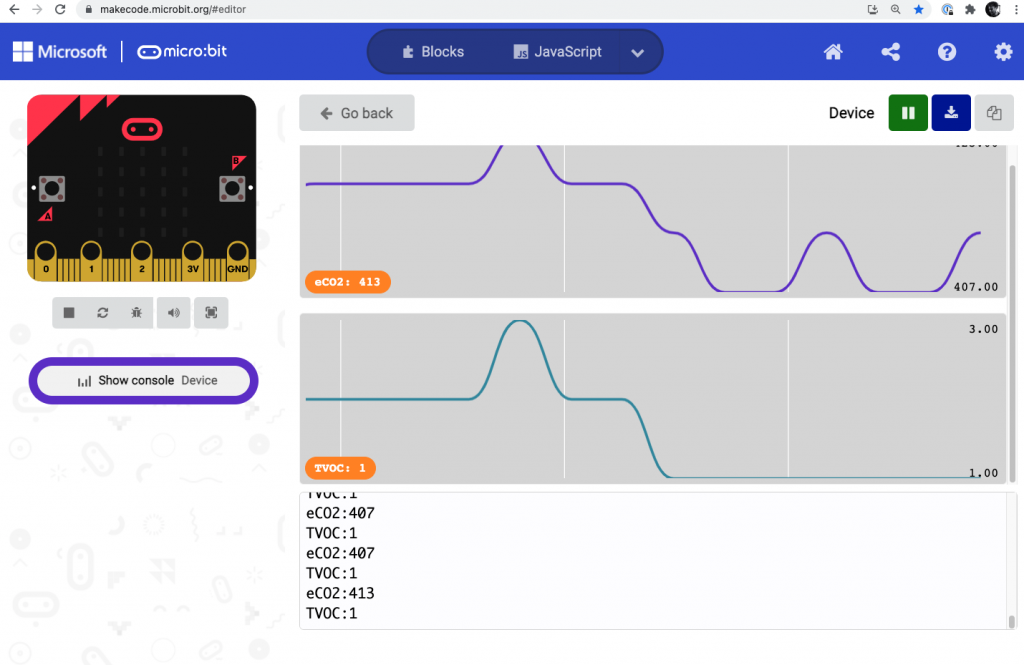
If you want to log the data in a really easy way, you can be a bit sneaky and use this microPython program with the MakeCode data graphing tool. Flash either version of the program, with or without the OLED display, to your micro:bit and modify the serial print lines so they look like this:

            print('eCO2:%d' % (s.eCO2))
            print('TVOC:%d' % (s.tVOC))

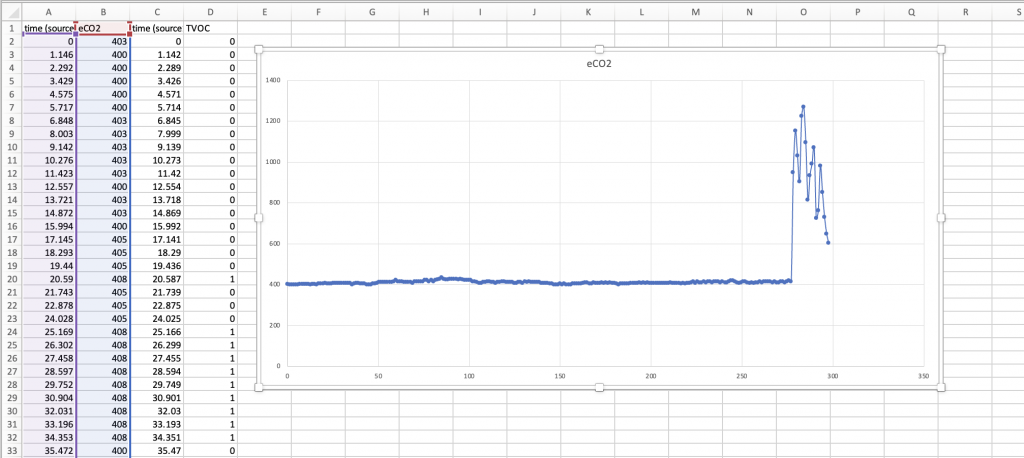
You can then connect the micro:bit to a computer, open a new MakeCode project and click on ‘show console Device’ under the simulator when it appears. You can then view data in real time, and also download it as a CSV file you can import into a spreadsheet like Excel:

Logging data in MakeCode

CO2 readings in an Excel chart

Buy a ready made air quality sensor

If you don’t want to mess around with soldering, breadboards, jumper wires and fiddling with software, there are several ready-made micro:bit accessories that you can just attach to a micro:bit.

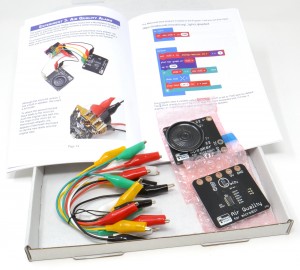
Monk Makes air quality kit for micro:bitThe Monk Makes Air Quality Kit has an eCO2 sensor and comes with everything you need to get going including a loudspeaker, and an excellent book of instructions and sample projects. This also lets you write code for it in MakeCode blocks as well as Python, making it accessible for younger students. This is a well-designed and tested product with great attention to detail in its packaging and documentation.

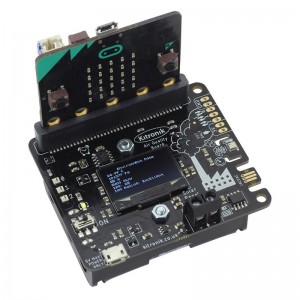
Kitronik air quality board for micro:bitThe Kitronik Air Quality and Environmental Board for micro:bit also includes a built-in OLED display and a real time clock for data logging. I’ve not tested this product but it can be programmed using an extension for MakeCode blocks and as well as eCO2 it measures temperature, pressure, and humidity. The MakeCode extension for their OLED display is excellent, so I have high hopes that the software that supports this very full-featured accessory is as good.

Posted in microbit | Tagged , , , , , | 5 Comments

One moment please, while I arrange the galaxy

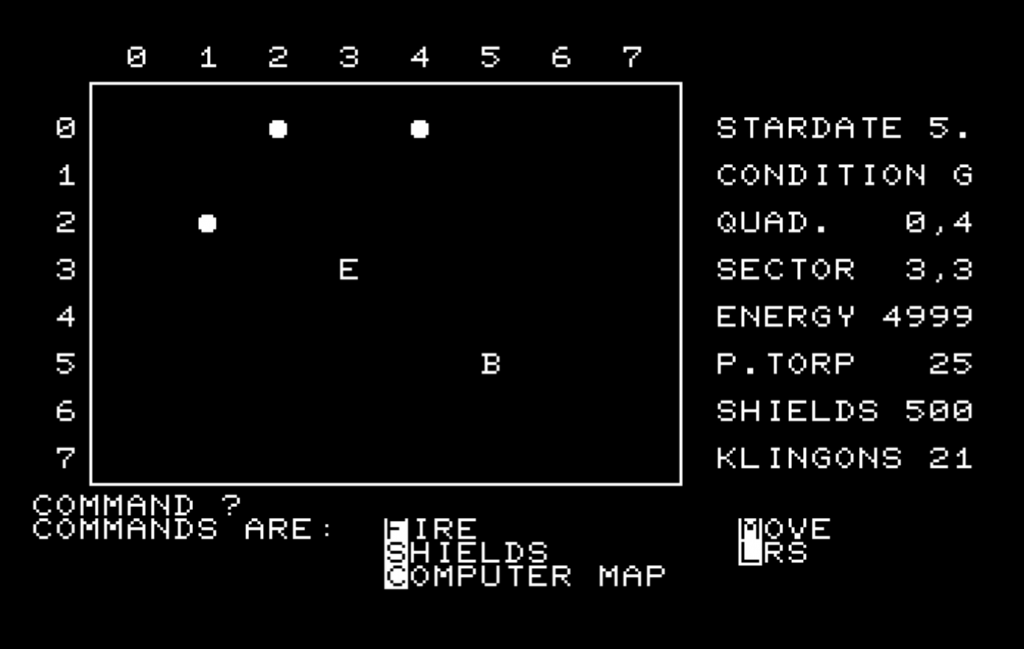
PET Star Trek screengrab

In 1977, the second computer I ever used was my dad’s Commodore PET 2001. This massive, sphinx-like machine of bent-steel with its terrible calculator keyboard, built-in cassette drive and ghostly white CRT monitor surrounded with a slightly IBM-ish shade of blue plastic sat in my dad’s radio shack, a small spare room upstairs in our bungalow. Yes, I know bungalows don’t have upstairses. Ours did.

Commodore PET

Ostensibly bought for business purposes, this machine with 8K of RAM was mostly used by me for playing, and occasionally writing, games. The two games I spent longest on were an insanely good and mysterious Space Invaders clone, possibly Japanese, written in machine code to add to its mystique. The other was Star Trek.

The original 60s Star Trek re-ran constantly on BBC TV in my childhood, and I loved it, so this game was instantly addictive.

There were a lot of Star Trek games around in the 1970s. I probably didn’t know this at the time, but they originated on mainframe computers in the early 70s, a version by Mike Mayfield in HP BASIC became popular, especially when it was modified up by David Ahl and published in 101 BASIC Computer Games in 1975 and Basic Computer Games in 1978.

These are mostly text-based games designed to be played over a teletype terminal: you type instructions and you get a printout. Typically you’d explore a galaxy of 8 x 8 quadrants, come in peace and shoot to kill Klingons as you find them. Different commands allowed you to see a grid printout of the quadrant you’re in, a longer range scanner to see a numerical representation of adjacent quadrants (how many stars, Klingons and bases) and a computer map of quadrants you’ve explored.

giles-surias-may81

This PET Star Trek was a bit different though. It had fewer instructions, and a pretty good attempt had been made to adapt it to the PET. It wasn’t just a text game. When you move, the ‘E’ for Enterprise was animated. Same for firing torpedoes.

I recently had a hankering to play this game again, and maybe translate it to Python. So I managed to track it down, and get it running in the VICE Commodore emulator on my MacBook. All good. But then a few odd things happened.

Stranger things

As I mentioned, there are a LOT of versions of Star Trek out there, and it took me a bit longer than I expected to find the one I remembered, even when searching Commodore sites. There’s a lot of stuff on the Commodore 64, understandably. Not so much on the PET. And when I went digging for the origins of the version I played, I hit a brick wall. Sites about BASIC Star Trek games of the 70s are old, rare and frustratingly full of dead links.

No prior or contemporary version of the game was quite like the PET Star Trek. It seems to have come out of nowhere.

So I looked at the program listing, initially thinking about my Python translation. On screen it’s an impenetrable fog, even though it’s written in BASIC. My programs were always well-spaced and easy to read, but I guess to save memory, this one has multi-statement lines and every strictly unnecessary space is omitted:

146 gosub63500:fori=1topd/3:poke59464,100:poke59464,140:next:gosub63600

This soup of pokes to memory to store numbers, opening channels to the CRT, and opaque bitwise AND and OR operations, all totally uncommented, makes it very hard to reverse engineer and translate. I decided I’d be better off recreating the game from scratch knowing what I do of the gameplay. But its very complexity, and intimate relationship with the hardware, suggests the author knew the PET very well indeed.

So who wrote it?

I looked at the listing again. There was one REM statement only:

1 REM SOUND&PROG.MODS: DUNCAN LANGFORD

It seems Duncan Langford may have been a Computer Science fellow at the University of Kent many years ago, but I’ve not been able to track him down so far. But he only added sound to it, who actually wrote it?

Memo to future self

I needed a proper program listing in a text file to study the game in more detail, so I decided to export one from the VICE emulator. Oh brother, little did I know what fun that would be. It took me an entire evening, at least 4 or 5 hours to get it to work. Indulge me for a moment, but the internet needs this recording. I need it recording when I forget and have to Google my own answer.

If you have a Mac and VICE 3.5 and you want to get a text file dump of a program listing, strap in and pay attention. this is what you need to do.

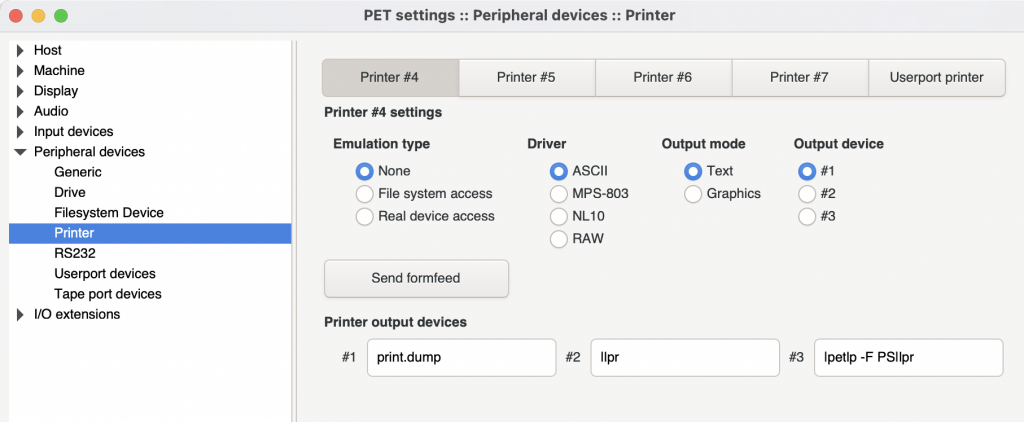
printing dialogue from VICE

In VICE, go to settings, peripherals, printer #4.

If it was already enabled, you must first disable printing by setting emulation type to none, then close the dialogue and re-open it. It took me literally hours to figure that out.

Then choose File system access, ASCII, text, output device #1 (print.dump)

In the emulator type

OPEN4,4
CMD4:LIST
PRINT#4:CLOSE4

Close emulator. You’ll find the listing in a print.dump file inside the app!

So right-click on VICE.app > Show package contents > Contents > Resources > print.dump and open it in your text editor of choice. And save it somewhere sensible.

Oh, I also ran the emulator at the command line with sudo open xpet.app – no idea if that was necessary but I was waving all the dead chickens by the time I got it working.

The hidden REM

It was gone 1am by now, so flushed with success I went to bed and it wasn’t until the next day I started to study the code. And I found something very odd. There was a second REM statement. One you can’t see when you list the program on a PET or in the emulator. A secret, hidden REM statement! I had no idea such things were possible.

11 rem"property of leonard tramiel .....................................

The name Tramiel is instantly recognisable to anyone who knows anything about the history of Commodore computers. Jack Tramiel (1928-2012) was a Polish Holocaust survivor who eventually settled in the US and founded Commodore. I discovered Leonard is his son, who is best-known for his work at Atari, but around this time, Leonard was working for the family firm. Did Leonard write this version of Star Trek? Was it merely from his personal collection, and he fingerprinted it, so if copies turned up anywhere he could trace them back to his original tape?

I’m still digging, and I’m very grateful to anyone who can help me track down Leonard or Duncan Langford. I’ll post any updates here.

In the meantime, I’ll be roaming the quadrants in search of a wasted youth.

ONE MOMENT PLEASE, WHILE I ARRANGE THE GALAXY

2022 update: Python port

I’m working on a Python port of the classic Commodore PET Star Trek so I can play it in my laptop’s console. It’s a fork of a Python translation of a C# port of the 1976 Super Start Trek BASIC game, so I’m gradually stripping out functionality and making it work more like the PET version which was optimised for a CRT with crude graphics, rather than a teletype console.

Source code is here: https://github.com/blogmywiki/pet-python-startrek

And you can play an early version of it in your browser here: https://trinket.io/python/38adc68043

July 2023 update: contact with Leonard Tramiel!

I am very grateful for Colin Haynes who contacted Leonard Tramiel for me on the Commodore International Historical Society Facebook group. This is what he said: “That’s a long time ago. I know I played a version of that game. I probably wrote one at one point but it wouldn’t have been an actual completed version. I have no idea how my name wound up in there.”

So the mystery remains!

Posted in computers, gaming, nostalgia | Tagged , , , , | Leave a comment

Simple machine learning abstraction for kids

Update: this also works on a BBC micro:bit, scroll down to find out more!

There are some great resources for teaching machine learning to kids, but I’ve noticed a lot of them rely on some magic happening in the cloud, or the code or training model is really complex, or they’re quite hard for a teacher to set up and explain.

This probably isn’t an original idea, but see what you think.

I made a really simple abstraction of what machine learning is: training a machine with data to do a task that a human would normally do.

In this case I’ve picked the task of teaching a machine number bonds to 10.

Number bonds are fundamental building blocks of maths that should be familiar to any school student: you learn early on to recognise what numbers you need to add to a given number to get to a round figure. For example:
1 + 9 = 10
2 + 8 = 10
70 + 30 = 100
and so on.

Here a simple Python program has an array 10 digits long to store its training data. Position 0 in the array holds the number bond for 0, position 1 holds the bond for 1, and so on.

We start by setting them all to 5, somewhere in the middle. The program generates random number between 0 and 9 and tells us what it thinks the bond to 10 is for that number. It also keeps score of right and wrong answers, and then we, the humans, get to have a go. When we give a correct answer, the program improves its training data not by changing its answer to ours – we might be wrong, and different people could be playing the game – but by taking an average of its existing answer and our new one. This means students can see the process gradually unfolding, and watch the training data get better over time.

So gradually you can see the machine’s answers getting closer to the correct ones. When you think it’s learned all or most of its number bonds to 10, you can reset the scores by typing ‘reset’ which keeps the training data in the array but allows us to have a game on something like equal terms.

A few things to note: the array holds averages that aren’t integers, for example it could hold 2.5 as a number bond, but the program rounds it using the Python round() function when displaying it and using it as an answer. This is to speed up the process a bit without making it too quick. You might want also to look at rounding numbers in Python, which is a whole other topic but potentially crucial for data science work. This seems like a good primer: https://realpython.com/python-rounding/. In short: rounding numbers in Python probably doesn’t work the way you think it does or should!

You might want to tweak the code so the training data can learn from incorrect answers as well, I’d love to know if you try that and if misleading the machine could be a sneaky strategy to beat it, albeit missing the point of the exercise entirely. In my experience, at least one student would do something like this.

Have a play with it, let me know what you think. Does this help explain ML in a simple way? What other examples can you think of?

Download the code here, read it below or try it out in Repl.it

# Simple machine learning example for kids by Giles Booth @blogmywiki
# https://youtu.be/h-Arrtg6x7c

# using decimals not integers so we can see it improve, thanks @veryalien!
bonds = [5.0,5.0,5.0,5.0,5.0,5.0,5.0,5.0,5.0,5.0]
import random
human_wins = 0
machine_wins = 0
turns = 0

print('Train a machine to learn its number bonds to 10!')
print('If I give you a number, you tell me what you add to it to make 10')

while True:
    number = random.randint(0,9)
    print()
    print(bonds) # added so you can see it improve its data set
    print('Number is ' + str(number))
    print('Machine says the bond to 10 is ' + str(round(bonds[number])))
    if number + round(bonds[number]) == 10:
        print('Machine is right!')
        machine_wins += 1
    else:
        print('Machine is wrong, more training data needed.')
    human_answer = input('Give me your answer 1-10: ')
    if human_answer == 'quit':
        break
    elif human_answer == 'reset':
        human_wins = 0
        machine_wins = 0
        turns = 0
    elif number + int(human_answer) == 10:
        print('Correct!')
        human_wins += 1
        bonds[number] = (bonds[number] + int(human_answer)) / 2
        print('Now machine thinks it is ' + str(round(bonds[number])))
    else:
        print('Wrong! Are you trying to mislead a poor machine?')
    turns += 1
    print('Human score ' + str(human_wins) + ' out of ' + str(turns))
    print('Machine score ' + str(machine_wins) + ' out of ' + str(turns))

Scratch version for younger students

If you’d like to try this with younger students, elfwoo is recreating this game in Scratch. Check it out!

Run it on a BBC micro:bit

This program will run unmodified on a BBC micro:bit in a serial console, or you can download this version that adds some sound and LED images. The video above explains more.

Posted in computers, education, microbit | Tagged , , , , , , | 5 Comments