
I’m really excited about a Python library called GPIO Zero. This makes it very easy to use the Raspberry Pi’s GPIO pins to do some physical computing in the Python programming language. The GPIO pins are how you connect your Pi to the real world, and their accessibility is what makes the Rapsberry Pi such an exciting device for so many people.
Here’s a simple traffic light project you could use to introduce Python and physical computing at the same time. You can get ready-made traffic light kits, but you make this one yourself.
Aim
In this project you will make a pedestrian crossing with 1 set of traffic lights and a push button, and learn how to connect your Raspberry Pi to lights and switches, and also learn some simple concepts of the Python programming language.
You will need:
- A Raspberry Pi (any model should do) with a recent version of Raspbian OS and the GPIO pins physically accessible – the Pibow Coupé case is good for this.
- An internet connection to install the GPIO Zero Python library (not needed thereafter).
- 3 LED lights, preferably red, yellow and green.
- A small breadboard (I used a tiny one I got with an Arduino kit).
- Some female – male jumper wires to connect to your Pi.
- Some male-male jumper wires to connect things on your breadboard to each other.
- 3 x 270Ω (or similar) resistors.
- A push button switch – any kind will do, as long as it’s a fleeting switch that pops back up after you press it, and you can connect it to your breadboard.
Getting ready
First, install GPIO Zero. You can find instructions here. I got some error messages when I did this, but it still seems to work ok.
Next, choose some GPIO pins on your Pi to use. You can use others, but I used pins 17, 18 and 2 using the BCM numbering system. (There are two different ways of numbering the Raspberry Pi pins; GPIO Zero uses the BCM / Broadcom system, which is how the pins are labeled on the Pibow Coupé case). If you’re not sure which pin is which, look at this incredibly clever & comprehensive interactive guide by Gadgetoid.
With your Pi turned off, wire up some light bulbs before we get programming. Use 4 female-male jumper wires to connect BCM pins 17, 18, 2 and a GND (ground/earth) pin – I used physical pin 6 as my GND, though there are others – to separate rows on your breadboard. It could look something like this:
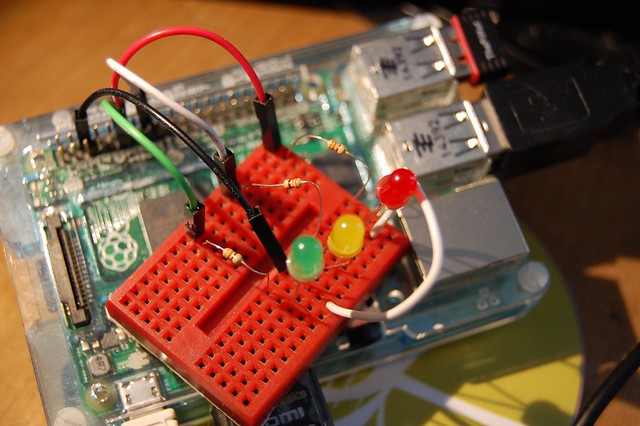
I used the GND pin as a common earth for all the LEDs. When you wire up a light bulb in school, you need to complete a circuit by connecting it back to the negative terminal on a battery, and this is the same – completing the circuit by connecting it back to GND. We can use the same GND for all our LEDs to make our wiring simpler.
The basic idea is that you connect GPIO Pin 17 on the Raspberry Pi to a 270Ω or 330Ω resistor – this is to stop the LED taking too much current from the Pi. You then connect the other side of the resistor to the long leg of the LED, and the short leg of the LED back to the GND pin on the Pi. You do the same for the other LEDs, all using the same GND pin.
The wiring looks a bit like this:

Now turn the Raspberry Pi on and test the LEDs and wiring. Open the Python IDLE editor (Menu > Programming > Python 3):

and enter the following Python code in the shell:
from gpiozero import LED
green = LED(17)
red = LED(18)
amber = LED(2)
green.on()
amber.on()
red.on()
That’s all the code you need to start lighting the LEDs. It should light each LED in turn. If they don’t all light, check your wiring and check the LEDs are the right way round – they only work one way.
Have a play around, turning the LEDs off and on, and see if you can make them blink:

Let’s look at these instructions line-by-line to understand what they do:
from gpiozero import LED
Python uses libraries of useful code that lots of people want to use. Here we are importing the ‘LED’ statement from the ‘GPIO Zero’ library, which makes physical computing in Python really easy to code.
green = LED(17)
red = LED(18)
amber = LED(2)
The next 3 lines then tell the RaspberryPi that we have connected some LEDs to pins 17, 18 and 2 and that we’re going to call them red, amber and green – you could pick any names you want.
The last 3 lines turn the lights on:
green.on()
amber.on()
red.on()
So far we’ve been typing commands straight into the Python ‘shell’, or command line. It’s useful to be able to save sets of instructions in a text file so they can be run over and over again, without having to retype the code each time. So, next open a new file and save it as traffic-lights.py:

Then type in the following, save it again, and run it by pressing F5. Your LEDs should now light in a sequence like a set of real traffic lights: green, amber, red, red & amber together, and then green again.
from gpiozero import LED
from time import sleep

red = LED(18)
amber = LED(2)
green = LED(17)

green.on()
amber.off()
red.off()

while True:
    sleep(10)
    green.off()
    amber.on()
    sleep(5)
    amber.off()
    red.on()
    sleep(5)
    amber.on()
    sleep(5)
    green.on()
    amber.off()
    red.off()

Notice we’ve got some new Python commands here. We have imported ‘sleep’ from the time module – sleep(10) pauses for 10 seconds, sleep(5) for 5 seconds.
We’ve also used ‘while True:’ – this is like the ‘forever’ block in Scratch. The code that follows while True: will keep on running until you close Python.
Notice as well that the code that follows is all indented by 4 spaces at the start of each line. These spaces at the starts of lines are important in Python, as we will see in the next part when we will add a push-button to make a pedestrian crossing…
Massive thanks to Ben Nuttall and the rest of the folk at the GPIO Zero project for building such a great Python library that, I think, makes physical computing with Python actually easier to learn that Scratch! My code is rather similar to theirs, but I wrote it even before I realised they had a traffic light project too – check it out!